|
1.
Starting from the adjacent wall, tap across the
ceiling to locate the joist for the double pulley.
When a hollow sound is replaced with a more solid
one mark this position with a pencil.
2.
Measure out the required distance between the
two pulleys and tap in towards the first fixing
point. Locate and mark the position of the ceiling
joist as above.
3.
On the adjacent wall mark two fixing points for
the cleat hook using the hook as a template.
4.
Drill the pilot holes for the pulleys ensuring
that these are wide and deep enough to take the
full depth of the pulley shaft. Drill the holes
for the cleat hook and insert the raw plugs.
5.
Lubricate each pulley shaft with a light oil and
gently screw each pulley into the ceiling. The
double pulley should be the one closest to the
adjacent wall and the single should be the one
furthest away.
6.
Attach the cleat hook to the adjacent wall using
the screws and raw plugs provided.
7.
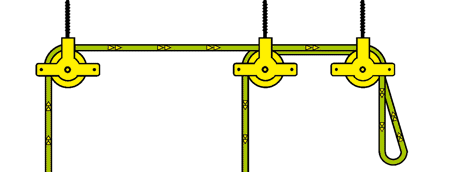
Thread the rope through the pulleys as detailed
below and tie the rack ends to the end of the
ropes. Ensure that the rope is not rubbing against
the pulley blocks and can run free on the wheels.
8.
Raise
each rack end so that it is flush with the ceiling
and tie a knot in the loop of the rope at chest
height. Lower the airer tying further knots at
40cm intervals until all the rope is tide away.
9.
Finally insert the wooden laths into the rackends
and put some laundry on to test.
    

Fig
1: Standard configuration showing one double and
one single pulley, as supplied with our clothes
airer kits.

Fig
2: Standard configuration with extra double pulley
and sash cord extension, allowing for greater
positioning away from the wall. Available to purchase
with any clothes airer or available separately
here.
    
|